Drawing your first 3D model
Once we have installed BBMOD
and converted our 3D model from a common file format to *.bbmod (see tutorials
Converting models with BBMOD CLI and
Converting models with BBMOD GUI),
we can finally include it into our GameMaker project, load it and draw it on the
screen. In this tutorial we will have a look at how to do that in as little
steps as possible, to get us started quickly on our 3D game development journey.
In this tutorial we will be using a modified version of a sports sedan model by Kenney.nl, which you can download here.
Note: We have used command
BBMOD.exe .\SedanSports.fbx -fuvy=false -iw=trueto convert the model from FBX to BBMOD.
Contents
Included files
Since *.bbmod files are not regular GameMaker resources, like sprites for
example, we have to add them into our project as Included Files. These files are
simply copied into the same directory as the game's executable. Since we do not
want to pollute the folder where the exe will be with our 3D models etc., we
will put our SedanSports.bbmod into the Data subfolder.

Loading a model
With our model placed in the right directory, we can go ahead and create an object that will load it in its Create event:
modSedanSports = new BBMOD_Model("Data/SedanSports.bbmod");At this point we have our model loaded, but we can also make it render faster by using its freeze method:
modSedanSports.freeze();Drawing a model
BBMOD offers two ways of drawing models - either using method
submit or method
render. While the
latter allows us to use BBMOD to its fullest potential, it requires a bit more
setup than the former. In this tutorial we are learning how to draw a 3D model
in as little steps as possible, so we will be using submit. When using this
method, we must call function bbmod_material_reset
before and after drawing models! This is because submit immediately sets shaders
used by the model's materials and these need to be unset at some point, otherwise
they would also affect drawing things that we do not want to.
bbmod_material_reset();
modSedanSports.submit();
bbmod_material_reset();
If we were to put our object into a room and run the game, it is likely that we would not be able to see the model just yet. That is because we have not changed its transformation and it is drawn at the same size and the same position as we have created it in our 3D modeling software. For example, if we have created a cube that was 1 unit in size and placed at the 0,0,0 coordinate, then in GameMaker it would be drawn as a one pixel at the top left corner of the window. This can be changed through something that is called the "world matrix" - either using the built-in GML function matrix_set, or using BBMOD's utility struct BBMOD_Matrix:
bbmod_material_reset();
new BBMOD_Matrix()
    .RotateZ(-45)
    .RotateX(45)
    .Scale(100, 100, 100)
    .Translate(x, y, 0)
    .ApplyWorld();
// Same as:
//matrix_set(matrix_world, matrix_multiply(
//    matrix_build(0, 0, 0, 0, 0, -45, 100, 100, 100),
//    matrix_build(x, y, 0, 45, 0, 0, 1, 1, 1)));
modSedanSports.submit();
new BBMOD_Matrix().ApplyWorld();
// Same as:
//matrix_set(matrix_world, matrix_build_identity());
bbmod_material_reset();
What the first added line does is that it creates a new identity matrix (a matrix that does not transform how things are drawn), scales it by 100 on all axes, moves it by the instance's position in the room and then sets it as the current world matrix. After we draw the model, we do not want the world matrix to affect other things that we would draw, so we change it back to the identity matrix.
Tip: You can learn more about the world matrix in the Transforming models tutorial.
Adding a material
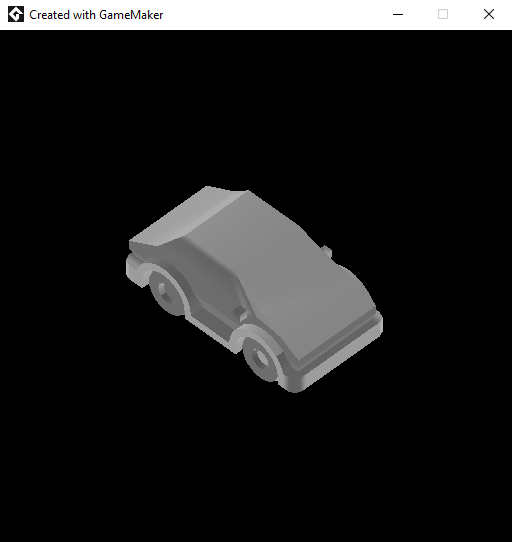
When we now place the object into a room and run the game, we should be able to see the model using the default material with a checkerboard texture.
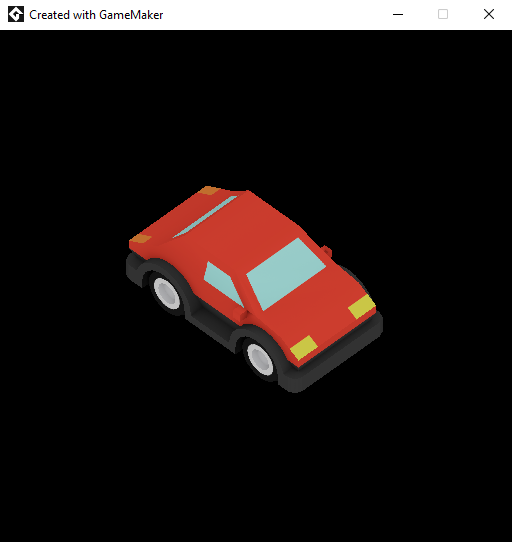
We can change this by making new materials and assigning them to the model. To make a new material, we do not actually have to write new shaders and new material structs from scratch. Instead we can just create copies of already existing materials, like BBMOD_MATERIAL_DEFAULT, and change their properties:
matSedanSports = BBMOD_MATERIAL_DEFAULT.clone();
// Change the checkerboard texture:
matSedanSports.BaseOpacity = sprite_get_texture(SprSedanSports, 0);
You can download the SprSedanSports sprite from
here
and add it as a regular sprite resource. To be able to use it as a texture, we
need to check the "Separate Texture Page" checkbox (1) under its "Texture Settings":

Now we can use method set_material to apply the material to the model:
modSedanSports.set_material("Body", matSedanSports);Our model happens to have only a single material slot called "Body" (which is
why we are passing it as the first argument). If our model had multiple materials,
we would simply call this method multiple times with different arguments. The
names of the material slots can be always found in the _log.txt file created
during the model conversion, but if we somehow do not know the names, we can
just write the materials directly into the
Materials
array. This is exactly the same as when using set_material, except we need to
find out in which order are the materials stored in the array (which is in our
case simple, since our model has only one material).
modSedanSports.Materials[0] = matSedanSports;A little detail that you may have noticed is that there is a gradient on the model, but it seems inverted, as if the light was coming from behind the car. This is because of the ambient light, which is split into two parts - light coming from the upper hemisphere (+Z) and from the lower hemisphere (-Z) and by default the light coming from below is configured to be a bit darker. We can fix this by switching the colors using functions bbmod_light_ambient_set_down and bbmod_light_ambient_set_up (or we could use bbmod_light_ambient_set, which changes both to the same color, but that would make the model look flat).
bbmod_light_ambient_set_down(BBMOD_C_WHITE);
bbmod_light_ambient_set_up(BBMOD_C_GRAY);
Here BBMOD_C_WHITE and BBMOD_C_GRAY are just macros for
BBMOD_Color, which is BBMOD's custom
color structure that supports HDR colors with range over 255.
Congratulations, you have now rendered your first 3D model in GameMaker!
Homework: Try adding code for rotating the car on the Z axis with left and right arrows using the
directionvariable.
Quick notes on resource managing
There is still one issue that you may have noticed - we are loading the same model and re-creating the same materials over and over again in the Create event of every instance, which is definitely not ideal. BBMOD does offer an advanced solution for this issue in form of a resource manager, but that is outside of the scope of this tutorial. For starters, we recommend you to add a special room at the beginning of the game, where you will load and create all required resources and store them into a globally accessible struct:
global.resources = {
    Materials: {},
    Models: {},
};

var _matSedanSports = BBMOD_MATERIAL_DEFAULT.clone();
_matSedanSports.BaseOpacity = sprite_get_texture(SprSedanSports, 0);
global.resources.Materials.SedanSports = _matSedanSports;

global.resources.Models.SedanSports = new BBMOD_Model("Data/SedanSports.bbmod")
    .set_material("Body", _matSedanSports)
    .freeze();

room_goto_next();
And then just use the resources in your game objects like so:
/// @desc Create event
model = global.resources.Models.SedanSports;
/// @desc Draw event
bbmod_material_reset();
new BBMOD_Matrix()
.RotateZ(-45)
.RotateX(45)
.Scale(100, 100, 100)
.Translate(x, y, 0)
.ApplyWorld();
model.submit();
new BBMOD_Matrix().ApplyWorld();
bbmod_material_reset();When you do not need a certain model or material anymore, you should free it using method destroy to avoid memory leaks. Though if you create all your resources only once at the game start like described above, then you do not have to worry about this, as they will all be destroyed at the end of the game.